Enhancing Web Pages with JavaScript
Table of Contents
Introduction
This article is written for web developers who have anywhere from zero to moderate experience with JavaScript, and wish to improve their understanding of the scripting language. I am assuming that you're familiar with HTML and CSS, and that you have at least some experience with designing a web page. The article will not cover the specifics of the scripting language itself (such as the syntax), but will instead teach how to go about using the language once it is learned. Therefore, it will help if you're familiar with the syntax of JavaScript (which looks much like that of C, C++, or Java), although such experience with the language is not required.
The purpose of this article is to clarify how JavaScript is used to enhance a web page, and to encourage doing this in the correct way.
What is JavaScript?
JavaScript != Java
Let's just get this out of the way right from the beginning: JavaScript and Java, despite having similar names and some syntactic resemblence (they look the same), have absolutely nothing in common. JavaScript was originally named "LiveScript," but its name was changed before release as a marketing ploy, to feed off of the success of the relatively new lanauge called "Java." This was a fairly successful maneuver by Netscape to bring attention to the language. But the similarity is in name only: JavaScript was not based off of Java. The names should absolutely not be used interchangeably; not even when accompanied by phrases such as "you know what I mean." OK. Let's move on.
ECMAScript and the DOM
JavaScript is best summarized as being an ECMAScript-based language that makes use of the Document Object Model (DOM). While this isn't entirely accurate, it's a good place to start. ECMAScript is a creation of the European Computer Manufacturers Association (ECMA), and is most accurately described as "the standardized version of JavaScript." The two scripting languages are essentially the same language. While JavaScript was developed first by Netscape, ECMAScript is intended to be a more general standard that can be applied to the creation of other scripting languages (for example, ActionScript, the scripting language used in Macromedia's Flash, is an ECMAScript language). In this way, while ECMAScript is technically based off of JavaScript, we can say that JavaScript is, in a sense, a child language of ECMAScript. Netscape, the creators of JavaScript, are working with the ECMA on the creation of ECMAScript, and the two languages are designed to be compatible. The ECMAScript standard (ECMA-262) can be found on the ECMA web site.
Since JavaScript is a more specialized language than the general ECMAScript, it has things that ECMAScript doesn't. Specifically, it has the Document Object Model (DOM). The DOM is the set of objects, properties and methods that allow a JavaScript script to read from and modify an HTML or XHTML document. To understand how JavaScript implements the Document Object Model, we must first understand how a Document can be Modeled as Objects.
The Document Object Model
Modeling an XML Document
HTML and XHTML, while being somewhat different in appearance, are treated the same way internally by a browser. XHTML is nothing more than HTML with some stricter rules (primarily, all tags must be closed) to make it a legal XML language. XML is a family of markup languages with the following appearance:
<element attribute="value" another-attribute="another-value">
(more elements)
</element>
A "tag" is the text between and including < and > (for instance, <p> is a tag, as is <a href="www.example.com">). An "element" is a more theoretical concept, and consists of an opening tag (such as <em>), a closing tag (</em>), and the contents inbetween (which is either text or more elements).
Every XML document has a single, outermost element that contains the entire document. In XHTML, this element is the html element, which surrounds the entire document between its <html> and </html> tags. While there are some things that are outside of these tags, such as the DOCTYPE tag (a little thing that all good web designers must understand), they are not considered to be a part of the XHTML document.
This outermost tag is an important one, as it is the basis of the document; the entire document resides inside of it. It has a couple of different names: the "document element," and the "root." The latter name comes from expressing the document in the form of a "tree." Understanding the tree representation of a document is an extremely important step to understanding the DOM.
Consider the following simple XHTML document and its representation as a tree:
<html>
	<head>
		<title>An Example XHTML Document</title>
		<link rel="stylesheet" href="style.css" type="text/css" />
	</head>
	<body>
		<p>This is an example paragraph.</p>
		<p>This is an example paragraph with
			<a href="stuff.html">a hyperlink</a> inside of it!</p>
		<p>And here's one with<br />a line break
			and an <img src="image.jpg" alt="image">.</p>
	</body>
</html>
Here is the document's representation as a tree:
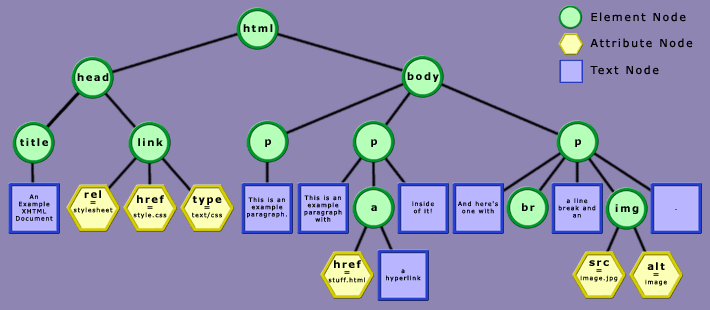
Compare this tree to the above code until you fully understand the relationship between them.
Every shape in the tree is called a "node." There are different types of nodes. One type of node, as we've already discussed,
is an Element. The root node (the uppermost one) is a specific element called the document element. There are other types
of nodes too: there are "attribute nodes," which represent the attributes and their values within an element (such as href="style.css"), and there are "text nodes," which are nothing more than strings of text (such as "This is an example paragraph.").
We talk about the relationships between nodes just as though they were people inside some sort of asexual family tree. Every
node has a "parent," except for the root node. A node's parent is the one "above" it in the tree. An attribute's parent is
the element that it is an attribute of, and an element's parent is the element which contains it. For instance, in the example,
the html element is the parent of the body element. Notice that an element can only have one parent.
Similarly, many nodes have "children." The children of a node are the ones that stem out from it in the tree. In the example,
the three p elements are all children of the body element.
Elements also have "siblings." An element's siblings are the other elements that have the same parent. The three p elements in the example are all siblings of each other. The text node containing the text "And here's one with" is a sibling of the following br element, and both are siblings of the nearby img element. Note that the text node containing "This is an example paragraph" is not a sibling of these elements, because it does not share the same parent. It would be more accurately described as their cousin.
When talking about these relationships, it is important to remember that the order of the elements is often important. An element's "next sibling" is the one that comes after it, and its "previous sibling" is the one that comes before it. An element is also called the "first child" of its parent if it has no previous sibling.
There are a few other important relationship terms that should be mentioned, although they are all intuitive if one understands their meaning with respect to a real family tree: a node's "ancestors" are the nodes that reside above it and it stems from, or, in other words, all of the elements that contain it. A node's parent is one of its ancestors, its parent's parent (its grandparent) is another ancestor, etc. Similarly, all of the elements that are contained inside of it are called its "descendants."
There is one final quirk that hasn't been mentioned because it really isn't logical, but it makes things easier in the long run: an attribute node is not a child (or a descendant) of the element node that contains it. Even though the containing element is the attribute node's parent, the attribute node is not considered to be the element's child. Again, this doesn't make any sense, but it helps out, because often when one is thinking of an element's children, he or she is only thinking of its child elements and text nodes. So just remember: an attribute node is never a child of anything.
Now that we've seen how an XML document can be modelled, we must discuss how objects come into play.
The Document as Objects
An "object" is a very theoretical concept of programming languages. JavaScript is heavily based around objects. A few JavaScript
objects that the reader may have already seen include the Math object, the Array object, the Object object, and the Window object. Objects may have properties (associated peices of information, such as the PI property of the Math object, accessed via Math.PI) and methods (functions attached to objects that have an effect somehow related to the object, such as the open method of the Window object, run by the code window.open(...)).
While a full discussion of objects is outside the scope of this article, it is important that you have at least a basic understanding of them. The structure of objects in JavaScript will be partially discussed later on.
The DOM functions as a way of representing the tree structure of a document via objects inside a programming or scripting language, such as JavaScript. It is a set of objects, along with their properties and methods, that can be used to give a language access to a document's tree. The DOM Technical Reports at the World Wide Web Consortium specify a number of types of objects that a language supporting the DOM should implement, in a language-neutral manner. (They specify the types of objects, but not the syntax with which the objects should be accessed or manipulated.) Every language has its own way in which these objects are implemented, including JavaScript. The technical reports of each level of the DOM (that is, each "version" of it) contain special sections titled "ECMAScript Language Binding," that specify how ECMAScript languages (such as JavaScript) are supposed to implement the DOM.
Here are some of the more important objects, with some of their properties and methods. Unless otherwise specified, their
JavaScript names are the same as their generic DOM names (for instance, the parentNode property of the Node object is accessed
by the parentNode property of an object in JavaScript).
- Node
-
Every object in the entire DOM is a type of Node. There are many different types of nodes, the most notable being Elements, Attributes, and Text nodes. You never have to work with instances of the Node object directly, since you work with the objects that inherit from the Node object - that is, they share the properties of it. In other words, you can consider this to be the list of properties that all of the objects in the DOM have. Here are some of the properties of the Node object:
- parentNode
- This property references the parent of the node.
- childNodes
- This property is a NodeList of the nodes that are children of the node. In JavaScript, this is simply an array of the child nodes.
- firstChild, lastChild
- These properties are the first and last children of the node.
- previousSibling, nextSibling
- These properties are the previous and following siblings of the node.
- insertBefore(newChild, currentChild)
- This method inserts the node newChild into the document right before currentChild, which must be a child of the node that the method is called from.
- appendChild(newChild)
- This method inserts the node newChild into the document as the last child of the node that the method is called from.
- removeChild(currentChild)
- This method removes the node currentChild from the document. currentChild must be a child of the node that the method is called from.
- Document
-
The Document object is the most encompassing object of the DOM. It is the primary object, and provides access to an entire document through its properties and methods. In JavaScript, the Document object for the current web page's document is accessed through - you guessed it -
document, orwindow.document.The Document object has the following methods:
- documentElement
- This property is the root node of the document, which in the case of HTML or XHTML is always the
htmlelement. - getElementById(elementId)
- Many people have seen this one already, as it is commonly used. This method searches through the entire document, until it
finds the element whose
idattribute is set to the string value given by elementId (the method's argument). It returns that element. - getElementsByTagName(tagName)
- This method returns a NodeList (or, in JavaScript, an array) of all of the elements in the document with the name given by tagName, in the order in which they appear in the document.
- createElement(tagName)
- This method creates an element that is equivalent to one that would be created by the tag given by tagName (for instance,
document.createElement("p")would create apelement). The element does not appear in the document until it has been added with theappendChildorinsertBeforemethods of an element that is already in the document. - createTextNode(text)
- This method creates a text node with the text passed into the method as its argument. The text node must be added to the document
just like a node created by the
createElementmethod.
- Element
-
Element objects are all over the place in a document. All of the tags within a document create an Element (for instance, every
<div>tag creates adivelement). Elements have all of the properties and methods of the Node object, as well as these:- getAttribute(attributeName)
- This method gets the value of the element's attribute named by attributeName, and returns it as a string.
- setAttribute(attributeName, attributeValue)
- This method sets the value of the element's attribute named by attributeName to the value specified by attributeValue.
- getElementsByTagName(tagName)
- This method works just like the Document object's method of the same name, except that it only returns the elements which are descendants of the element that the method is being called from.
- Text
-
Finally, the Text object represents a text node. It doesn't actually have any important properties or methods of its own, but inherits some from the CharacterData object, which hasn't been mentioned. A couple of these are:
- data
- This property is the text which the text node contains.
- length
- This property is the length of the text which the text node contains.
These are only some of the objects, properties and methods which are included in the Level 2 DOM, and even more are coming in the Level 3 DOM. To see a more thorough list of them, check out the Level 2 DOM Core Technical Reports and the corresponding ECMAScript Language Binding.
Now that many of the significant objects in the DOM have been explained, it's time to illustrate them with a working example.
The following example is a minimal XHTML page with an empty body element. It contains a script that adds content to it when the page loads. Here is the XHTML page:
<html>
	<head>
		<title>JavaScript DOM Example</title>
		<script type="text/javascript" src="changecontent.js"></script>
	</head>
	<body></body>
</html>
And here are the contents of changecontent.js:
window.onload = change_content;
function change_content()
{
	var html_element, body_element, p_element, text_node;

	// the document element in an XHTML document
	// is always the html element
	html_element = document.documentElement;
	// the body element is the second and last child
	// of the html element
	body_element = html_element.lastChild;

	// create a paragraph element and a text node
	p_element = document.createElement("p");
	text_node = document.createTextNode(
		"This text was generated by JavaScript!");

	// put the text node in the paragraph element
	p_element.appendChild(text_node);
	// and put the paragraph element in the document's body
	body_element.appendChild(p_element);

	// create a separate paragraph element and text node
	p_element = document.createElement("p");
	text_node = document.createTextNode(
		"This is more generated text. " +
		"Notice how <em>HTML</em> tags have no effect, " +
		"since text nodes contain only pure text.");

	// insert the text node into the paragraph element
	p_element.appendChild(text_node);
	// and insert the paragraph element into the document's body,
	// before the body's first child (which is the paragraph that
	// was added before).
	body_element.insertBefore(p_element, body_element.firstChild);
}
Take a look at the example in action. (You might want to open it in a new window.)
The script begins by setting window.onload to the change_content function, so that when the page has finished loading, the function will be called. The change_content function makes use of the DOM to add content to the page.
The function starts off by setting some convenience variables, called html_element and body_element. This allows simpler access to these elements later on. The function then creates a paragraph node with the Document object's
createElement function, and a text node with its createTextNode function. These newly created nodes do not yet exist in the document; rather, they only exist as the values of the variables
p_element and text_node. If the function ended at this point, the body would remain unchanged. However, the function goes on to insert the text node
as the last (and only) child of the p element (through the use of the element's appendChild function), and then inserts the p element as the last (and only) child of the body element in the same way.
The function then repeats the same procedure, reusing the variables p_element and text_node. This time, however, the p element is not appended as the body element's last child, but it is inserted as its first child, through the use of the insertBefore method of Element objects. This function inserts the p element before the body element's first child, accessed via body_element.firstChild, which has the effect of making the p element the body element's new first child.
Since the two dynamically created p elements and their corresponding text nodes have been added to the document's body element, they are visible in the document when the function finishes.
Now that we have the ability to alter the content of a document with JavaScript, we need a way to alter its appearance. Let's take a look at how the DOM has been extended to allow manipulation of Cascading Style Sheets.
Cascading Style Sheets in the Document Object Model
There is a whole other section in the DOM Technical Reports at the W3C which provides even more objects through which the style sheets on a web page can be accessed and manipulated. That section is called the DOM Style Specification. We could go into the details of this specification, and learn how to access CSS style declarations and all that through JavaScript, but the truth is that browser support for this section of the DOM dwindles, and much of it can't be used directly in practice. Instead, we will cover only a specific part of the specification (namely, the CSS2Properties object) which allows us to edit the style properties of a single element in the document at once.
The style property of any Element in the DOM gives us access to the CSS properties associated with it. Editing the contents of this
object is conceptually the same as editing the style attribute of the respective element. For instance, if we had the following XHTML tag in a document:
<div id="warningMessage" style="border:1px solid red; background:orange;">
Warning!
</div>
And we edited the object document.getElementById("warningMessage").style, we would be editing the object that holds the border and background CSS properties for the warning message. This allows
us to change the appearance of the element.
This style object contains a property corresponding to every single CSS property. Given a CSS property, you can find the corresponding
JavaScript property by removing all hyphens and capitalizing the following letters. (For instance, the background-image CSS property can be changed by setting the backgroundImage property in JavaScript. The hyphen was removed, and the letter after it was capitalized.) There is one exception: since float is a reserved word in JavaScript, the property cssFloat must be used to access an element's float CSS property.
It is important to remember that, when setting any of these properties, you are setting them to string values, not numbers. For instance, if you wanted to change the font size of an element to 12 pixels, the following code would be incorrect:
p_element.style.fontSize = 12; // INCORRECT!! WHAT WERE YOU *THINKING*?!?
Rather, you must set the property just as though you were setting it in CSS:
p_element.style.fontSize = "12px"; // Correct. Don't do it again.
And, naturally, you may use any unit of measure that you want - you are not limited to pixels any more than you are when working normally with CSS.
With the understanding of this simple object, we are suddenly able to create amazing effects on web pages. This is one possible effect. Don't open the link in a new window, it won't work.
How does it work? When you click the link, a JavaScript function is executed which uses the DOM to find the correct element
in the document via its id property and the document.getElementById method. The element's position CSS property is then set to the value relative, which means that its left and top CSS properties can be set to offset it from its default position on the page.
Using JavaScript's setTimeout function, another function is then run at regular intervals (once every tenth of a second) which changes the element's left and top CSS properties, to move it around. The math behind the movement of the object is a little complicated, and invoves some trigonometry.
The important point, however, is that after the element's position is calculated, the Math.round function is used to round it off to an integer value, and then the string "px" is appended to it, resulting in a legal CSS value (such as 10px).
Here is the JavaScript code used for the animation:
var wackyElement, radians, doingWackyStuff = false;
function doWackyStuff()
{
	// don't let them do it more than once at a time
	if (doingWackyStuff) return;
	doingWackyStuff = true;

	// get the element
	wackyElement = document.getElementById("wackyParagraph");
	// set its position to relative
	wackyElement.style.position = "relative";
	// remove the little dotted line around the
	// link that they clicked in Internet Explorer
	window.focus();

	// begin the animation
	radians = 0;
	setTimeout("wackyAnimationFrame();",100);
}
function wackyAnimationFrame()
{
	if (radians > Math.PI*4)
	{
		// stop after two full loops (2 * 2*pi)
		wackyElement.style.left = "0px";
		wackyElement.style.top = "0px";

		doingWackyStuff = false;
		return; // no more animation
	}
	// use some math functions to calculate
	// the element's current position
	wackyElement.style.left =
		Math.round(Math.sin(radians)*50) + "px";
	wackyElement.style.top =
		Math.round(Math.sin(radians*2)*50) + "px";

	// increase the radians for the next frame
	radians += Math.PI/20;

	// do the next frame in 100 milliseconds
	setTimeout("wackyAnimationFrame();",100);
}
A Few Hints and Tips
The HTML DOM
There's another helpful little part of the DOM that I haven't mentioned yet. (Actually, there's more than one, but that's a secret.) That's the DOM HTML specification. This part of the DOM contains a lot of extra nifty properties that only apply to HTML and XHTML documents. Since that's what the majority of web designers work with most of the time, it comes in very handy.
In fact, if you've worked a lot with JavaScript in the past, chances are you've used the HTML DOM without even knowing it. The list of additional properties is too large to explain in detail here, but some of the highlights include:
- A number of properties of form related elements, such as the
inputelement, which make it easier to work with forms. See Interface HTMLInputElement. This includes things like thecheckedproperty for checkboxes, thefocusandblurmethods, and a lot more. - Some properties of the
imgelement, including the popularsrcproperty. See Interface HTMLImageElement. - Table-related properties and methods, some of which are extremely convenient when manipulating tables via the DOM. See Interface HTMLTableElement.
That just scratches the surface. Take a look at the DOM HTML specification to see what else there is.
In general, when there is an HTML DOM property available to create some effect, you should use it rather than using the DOM
normally. This is because browser support for these extra features has been around much longer. For instance, rather than
using the code my_element.setAttribute("class", "happyElementClass"), you should use the className property as defined in Interface HTMLElement. This particular one is important, since even recent versions of Internet Explorer don't change the element's style when
you change its class with the setAttribute method. The same goes for setting an element's ID: use the id property instead of setAttribute.
A Warning
When you use the DOM, you're using relatively new technology. In my experiments with DOM-driven scripts, I have seen a lot of memory errors. In other words, the browsers I was running the scripts on simply crashed. I'm not talking about JavaScript errors here, I'm talking about "illegal operations." Sometimes, there are no errors, but other unexpected things happen. Not surprisingly, the majority of these errors occur in various versions of Internet Explorer. It can be quite frustrating to deal with these, but here are a few pointers:
- Don't try to create radio buttons with the DOM. Internet Explorer doesn't treat them properly. It won't crash, but the buttons will behave strangely.
- Internet Explorer for Windows will not respect the
checkedproperty of a checkbox or theselectedIndexproperty of aselectelement unless you set them after the checkbox orselectelement have been added to the page. - Don't edit the
optionsarray of aselectelement until theselectelement has been added to the page, or IE 5/Win will crash. - If you encounter a browser crash, experiment with various methods of restructuring your code. Try using the
appendChildmethod and related methods in a different order, for instance. Try to write different code that has the same effect. - When all else fails, use
alertboxes. Scatter them all around your code, and experiment to see what the last alert box you get is before the browser crashes. By doing this, you should be able to track down the problem to the exact line of JavaScript that causes it. Then you can work on finding ways to do what that line does differently.
Don't worry; these problems don't occur frequently. Nonetheless, test often as you write code, and never assume that your code will work in a browser that you didn't test it in.
Handling Browsers Without DOM Support
JavaScript programmers who have been around for a few years may recall the document.all and document.layers arrays. Simply put, these were the bases of Internet Explorer's and Netscape Navigator's "Level 0" Document Object Models,
respectively. That is, these two arrays were the ways in which you could access elements in each browser, before the DOM was
standardized by the W3C.
If you've never heard of these objects, you should be thankful. The DOM is a much more elegant method of accessing and manipulating a document than these were, and it is supported in all version 5.0+ browsers. The only reason you'd ever need to know about these two arrays is if you needed to create fancy effects in vertion 4.x browsers.
I'm not going to go into the details of how these arrays are used. It suffices to say, if you need a web page to be accessable to users of version 4.x browsers, you should make the web page work in those browsers without any fancy effects at all. By doing the following simple test, you can figure out if a browser supports the DOM correctly, and abort your script if not:
if (typeof(document.getElementById) == "undefined")
	return;
After that, supporting browsers that don't understand the DOM is as simple as making sure that all of your content is visible to users without any scripting at all. It is important that you use scripts only for enhancing web pages; not as integral parts of web pages. If your web page doesn't work in a browser that doesn't support your scripting language (JavaScript, for instance), then you need to reevaluate your design techniques. For instance, a web page that contains a drop-down menu that only works via JavaScript is poorly designed. Write your code so that it degrades in such situations to useable HTML elements. A well coded drop-down menu will display as something like a list of hyperlinks to a user who doesn't have JavaScript enabled in their browser. Writing code in this way takes a lot of practice, but it is an incredibly important skill for a web designer to have.
Always test your pages with JavaScript turned off to make sure they're useable without the scripts.
For more information on how to approach design while keeping every possible user in mind, check out Owen Briggs' old design rant.
Conclusion
There you have it. You are now pretty much up to date with standard-compliant scripting methods. I hope that this article cleared up any confusion or misconceptions that you may have had about the DOM, and I hope it inspires you to have some fun with JavaScript on your own web site. The applications are nearly endless.