Placing Ramps
Table of Contents
Introduction
This tutorial explains the basics of creating flawless ramps between different cliff levels in the Warcraft III World Editor. This is a difficult task that new users tend to find frustrating, since it must be done in a very precise way. However, once the basics are mastered, the map creator will be able to create complex landscapes in a much shorter time, and with much less frustration.
Setting up the Cliffs
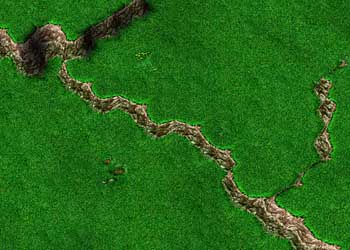 The very first step to creating a ramp is to set up the cliffs that it will transition between. This can be done with the
"Increase One" and "Decrease One" buttons in the Tool Palette. (You must be in Terrain editing mode, which is accessed via
Layer -> Terrain or with the "T" shortcut key.) To the right is the cliff that we will be using for our example. I encourage
you to open up the world editor and follow along with the images for practice.
The very first step to creating a ramp is to set up the cliffs that it will transition between. This can be done with the
"Increase One" and "Decrease One" buttons in the Tool Palette. (You must be in Terrain editing mode, which is accessed via
Layer -> Terrain or with the "T" shortcut key.) To the right is the cliff that we will be using for our example. I encourage
you to open up the world editor and follow along with the images for practice.
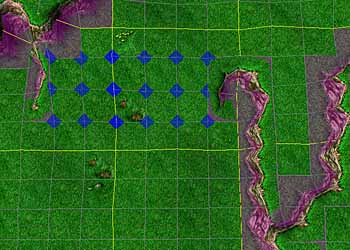
A very important point is that we can only create ramps along cliffs that are one level high. In the example shown, there are some cliffs that are two levels high. Ramps cannot be placed along those cliffs. If you want to create a ramp that goes up more than one level, you must use multiple ramps, one after the other. We will only be placing a single ramp along the one-level-high cliff.
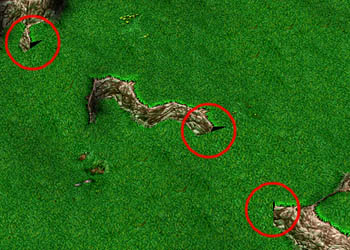 If you were to try placing a ramp along the cliff as it stands, you would fail miserably. This is a common mistake for new
users. You are likely to get the effect shown at the right. The reason for this is that ramps can only be placed along perfectly horizontal or vertical cliffs. (Actually, that's not entirely true. You can place ramps partially on diagonal cliffs if both ends of the ramps are on straight
cliffs. However, sometimes this causes ugly shadows, and it's rarely necessary.) You should never settle for a cliff that
has these artifacts. It looks very ugly and degrades the quality of your map. Before trying to place a ramp, we must straighten
out the cliffs.
If you were to try placing a ramp along the cliff as it stands, you would fail miserably. This is a common mistake for new
users. You are likely to get the effect shown at the right. The reason for this is that ramps can only be placed along perfectly horizontal or vertical cliffs. (Actually, that's not entirely true. You can place ramps partially on diagonal cliffs if both ends of the ramps are on straight
cliffs. However, sometimes this causes ugly shadows, and it's rarely necessary.) You should never settle for a cliff that
has these artifacts. It looks very ugly and degrades the quality of your map. Before trying to place a ramp, we must straighten
out the cliffs.
To make the cliffs straight, it helps to have the grid turned on. There are two ways to turn on the grid. One is to go through the View menu to Grid, and then select Medium. The other way is to press the "G" shortcut key twice. The grid is quite helpful when working with terrain.
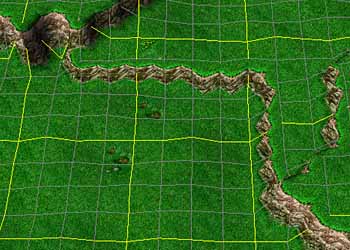 We use either the "Same Level" or the "Decrease One" terrain tool to straighten out the cliff as shown. The cliff must be
perfectly straight. Make sure that it stays between the gridlines. We are allowed to have 90 degree corners between horizontal
and vertical parts of the cliff, but they must be at least two spaces apart from each other and from other cliffs.
We use either the "Same Level" or the "Decrease One" terrain tool to straighten out the cliff as shown. The cliff must be
perfectly straight. Make sure that it stays between the gridlines. We are allowed to have 90 degree corners between horizontal
and vertical parts of the cliff, but they must be at least two spaces apart from each other and from other cliffs.
Now that we have set up the cliffs correctly, it's time to place a ramp.
Placing the Ramp
Placing a Straight Ramp
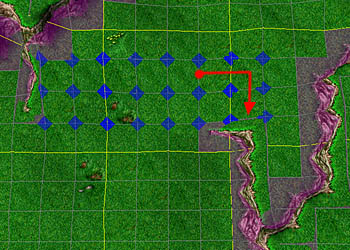
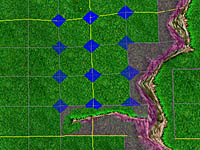
When placing ramps, it is important to make sure that you're giving units enough space to walk around in. To see where units can walk, we turn on the "pathing" map. This can be turned on by going to View -> Pathing, or with the "P" shortcut key. When pathing is turned on, you will see purple, blue, and normal areas. Purple areas cannot be walked on. Blue areas can be walked on, but buildings cannot be built there (this happens mainly in shallow water). With both pathing and the grid turned on, we are ready to proceed.
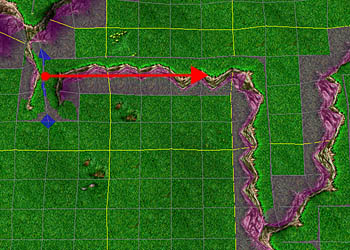 Select the "Ramp" tool in the Tool Palette. Click along the edge of the cliff where you want to place a ramp, and drag along
the cliff as shown. This will turn the cliff into a ramp.
Select the "Ramp" tool in the Tool Palette. Click along the edge of the cliff where you want to place a ramp, and drag along
the cliff as shown. This will turn the cliff into a ramp.
Notice that the ramped areas have little blue diamonds where the gridlines meet. These blue diamonds are only visible when the grid is visible, and they show you where you have placed a ramp. You should not change the cliff level on a space with a blue diamond. Doing so can create strange artifacts and it can be difficult to fix. If you want to change the cliffs where there are blue diamonds, you should first remove the ramps that are causing the diamonds to be there. Doing this returns the cliffs to normal.
 Here is the result of clicking and dragging with the Ramp tool as shown in the earlier image. We have successfully placed
a ramp along a straight peice of cliff, and it is time to tackle the 90 degree corner.
Here is the result of clicking and dragging with the Ramp tool as shown in the earlier image. We have successfully placed
a ramp along a straight peice of cliff, and it is time to tackle the 90 degree corner.
Placing a Ramp Over a Corner
Corner ramps are slightly more difficult than straight ramps, and they are more likely to fail. In fact, if you don't have pathing turned on, sometimes they will fail and there will be no visible indication that they did. This leaves areas that look normal but units are unable to walk on. Because of this, it is important that you have pathing turned on when placing ramps over corners.
 This is the wrong way to place a ramp over a corner. Notice how the pathing did not change from purple to normal, and there
is a graphical glitch. This is unacceptable and should be redone. Note that sometimes the graphical glitch won't be present,
but the incorrect pathing will. If purple pathing squares are left, you did the corner incorrectly.
This is the wrong way to place a ramp over a corner. Notice how the pathing did not change from purple to normal, and there
is a graphical glitch. This is unacceptable and should be redone. Note that sometimes the graphical glitch won't be present,
but the incorrect pathing will. If purple pathing squares are left, you did the corner incorrectly.
Sometimes, when a corner has been placed incorrectly like this, it can be fixed by dragging the Ramp tool over the incorrect area. However, that method doesn't always work, and sometimes you must Undo the action (Edit -> Undo or ctrl+Z) and try again.
 This is the correct way to place a ramp over a corner. Notice how the pathing is completely plain (units can walk over it),
and there are no graphical glitches at all. They key is to cover the very corner block with the ramp tool.
This is the correct way to place a ramp over a corner. Notice how the pathing is completely plain (units can walk over it),
and there are no graphical glitches at all. They key is to cover the very corner block with the ramp tool. 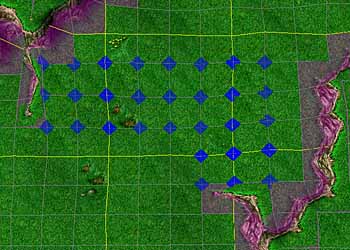 Once the ramp has been placed over the corner, you can continue dragging the Ramp tool downwards to complete it.
Completing the Ramp
Ramps are greedy, and want plenty of space around them. In the example shown, I was unable to continue the ramp downwards
because there was a cliff in the way below it. However, I wanted the ramp's edge to be farther south. 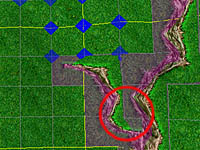 In order to do this, I had to use the Same Level terrain tool to remove some of the higher-level cliff that was in the way,
as shown.
In order to do this, I had to use the Same Level terrain tool to remove some of the higher-level cliff that was in the way,
as shown.
 Once the cliff was out of the way, I was able to extend the ramp the rest of the way downwards.
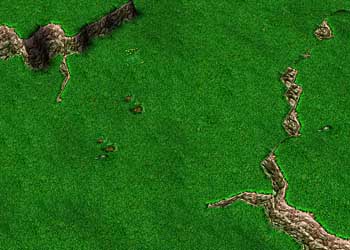
After a final check to make sure that there are no graphical glitches and that the pathing is perfect, turn off the pathing and the grid. Zoom the camera out and look at your completed ramp!
Removing a ramp
When a ramp has been placed well, removing it is a minor issue. Simply use the Ramp tool while holding down the Shift key, and drag right over the same places you did when you originally placed the ramp. The ramp will disappear and turn back into a cliff.
If, however, the ramp was placed incorrectly in the first place, or if you modified the terrain height near or on a ramp (like I told you not to), removing it in this manner may not work very well. It may leave some blue diamonds behind, making it hard to place ramps again in that area. To fix this, use the Increase One or Decrease One tool on the blue diamonds. Doing this should cause them to disappear. You can then reverse the side-effects by using the Down One Level or Up One Level tools respectively on the same spot. This should return the terrain to its original formation, but any nearby ramps should be gone. Sometimes this will take a few tries, and you may have to resort to completely flattening the area out into a single cliff level and starting over.
Conclusion
There are a few extra things you may choose to do with your finalized ramp. You might use the Raise and Lower terrain height tools to reduce the sharpness of the vertical transition, especially at the ramp's corner. Don't be afraid to apply textures and doodads to the ramp just like you would anywhere else. However, be careful to always leave enough room for a good sized army to walk up and down the ramp comfortably.
There is no limit to the number of ramps you can use in your map. While you should use them wisely, as they provide an element of strategy to a map, you should be able to create complex mountainous terrain with some practice. Just remember the number one rule of ramp placement: never settle for an ugly graphical effect! Take pride in the appearance of your map.
Now go, and create beautiful maps with your newfound ramp skills!